Comet for Windows Tutorial
|
Japanese version Home page |
Updated on June 16, 2007 |
![]()
|
Japanese version Home page |
Updated on June 16, 2007 |
![]()
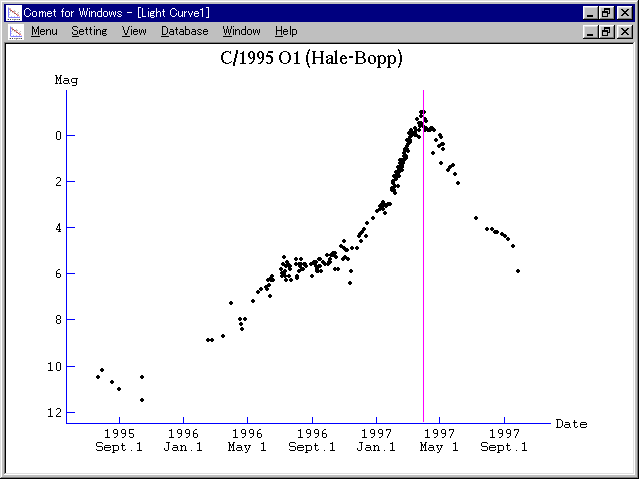
First of all, let's draw the light curve of Comet Hale-Bopp. Please launch Comet for Windows, and select "Menu" - "Light Curve" menu. Then select "Setting" - "Select Comet" menu, and select "C/1995 O1 (Hale-Bopp)". Then the light curve is displayed.
Selecting "View" - "Format" menu, various patterns of light curves can be displayed. For example, the following light curve will be displayed by selecting "Logarithm of Heliocentric Distance" for the horizontal axis, "Distance Corrected Magnitude" for the vertical axis, and checking "Fold and Overlay" check box.
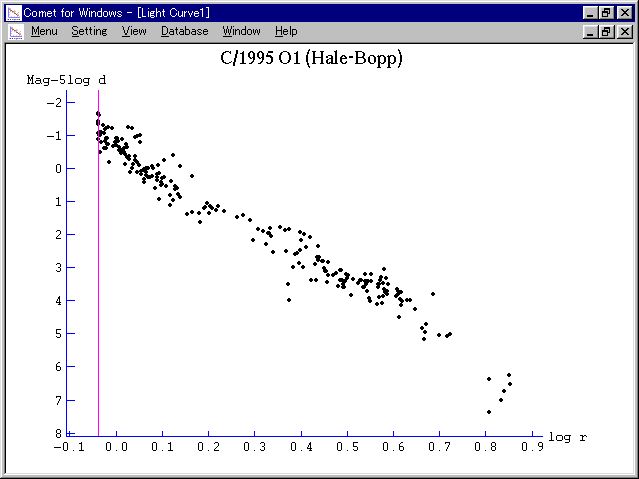
In general, light curve of a comet becomes linear in this type of a graph.
Next, let's analyze this light curve.
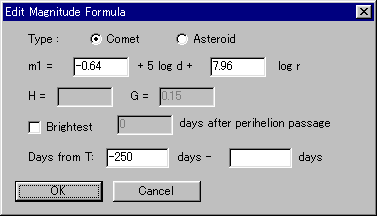
Please select "Setting" - "Calculate" menu. Then "Calculate Magnitude Formula" dialog appears and you can calculate magnitude formula which expresses this light curve.
When the dialog appears, a magnitude formula calculated from all magnitude data is displayed at "Calculated Formula" part with the residuals. In the case of this sample data, a magnitude formula:
m1 = -0.64 + 5 log d + 7.96 log r
is calculated based on 242 data.
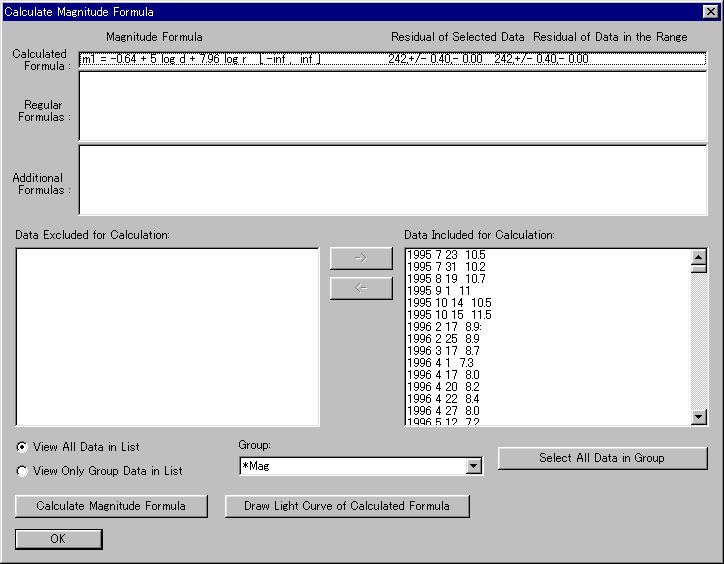
You can choose data to use for calculation. The magnitude formula is calculated only based on data in the "Data Included for Calculation" list box at right side.
Now, let's draw the curve of the calculated magnitude formula on the graph and see what the formula shows. Please push the "Draw Light Curve of Calculated Formula" button, and push "OK" button, then the calculated magnitude formula is added. Then please close the "Calculate Magnitude Formula" dialog, and the curve of the calculated magnitude formula is drawn on the graph.
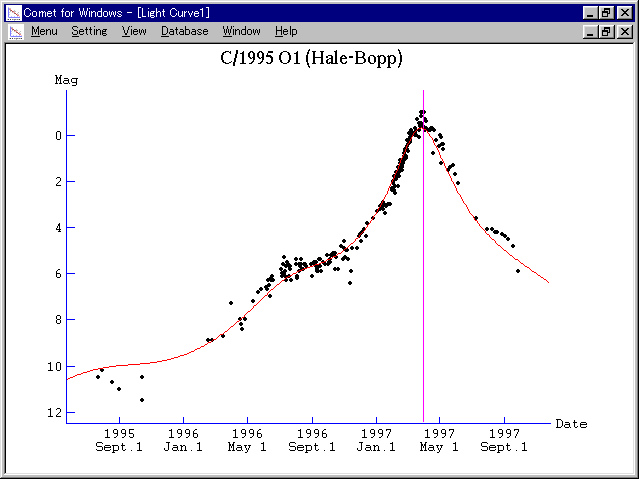
We can see that the calculated magnitude formula well fits with the actual light curve.
By the way, Comet Hale-Bopp was announced as a great comet to be -2 mag at the discovery. This is predicted from the following magnitude formula:
m1 = -2.0 + 5 log d + 10 log r
which is calculated based on the very early observations assuming the coefficient of log r as 10.
So let's see the difference between this magnitude formula and the actual light curve. Please select "Setting" - "Add Magnitude Formula" menu. Then "Add Magnitude Formula" dialog appears, where only the magnitude formula we calculated before is listed up.
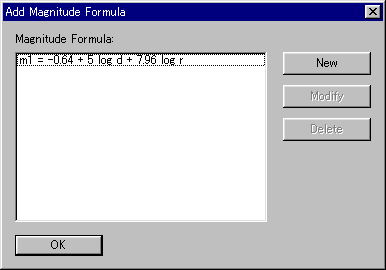
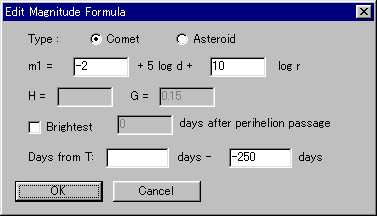
Here please push "New" button, and input the magnitude formula:
m1 = -2.0 + 5 log d + 10 log r
Let's select green color for it.
Please push "OK" button, and a green curve is drawn on the graph. This is the curve to show the early prediction.
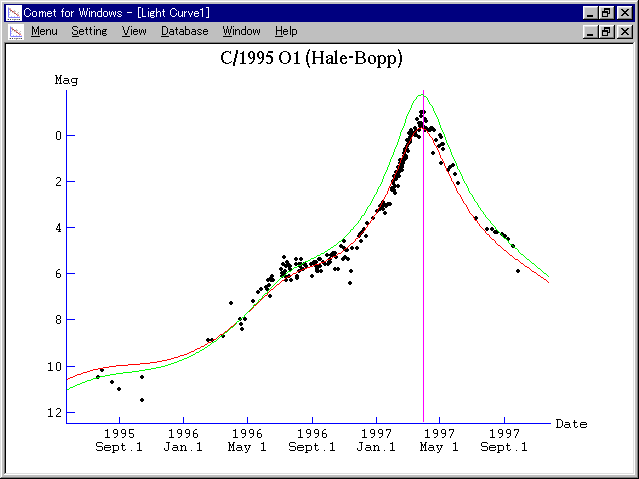
The early prediction had been fitting with the actual light curve at first, however, the comet became a bit fainter than the prediction from the midway. The border looks around 1996 September. Selecting "Days from T" for the horizontal axis, the border looks around 250 days before the perihelion passage.
As revealed in this case, light curve of a comet cannot be always expressed by one magnitude formula. So Comet for Windows supports combined light curve. We can divide the time into several periods and set a magnitude formula for each period.
Now it is revealed that light curve of Comet Hale-Bopp is expressed by the following two magnitude formulas:
Until 250 days before T : m1 = -2.0 + 5 log d + 10 log rSince 250 days before T : m1 = -0.64 + 5 log d + 7.96 log r
Therefore, let's save this result into the database.
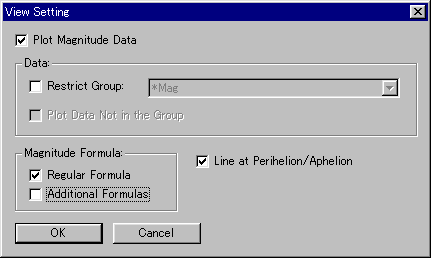
Please select "View" - "Setting" menu and clear "Regular Formula" check box.
Next, please select "Database" - "Magnitude Formula" menu. Then push "New" button and input the two magnitude formulas.
Then a curve which shows the regular light curve, combining the two magnitude formulas.

Now let's play with Comet Hale-Bopp.
Please select "Database" - "Comets" menu, select Comet Hale-Bopp from the list, and push "Modify" button. Then "Edit Orbital Elements" dialog appears.
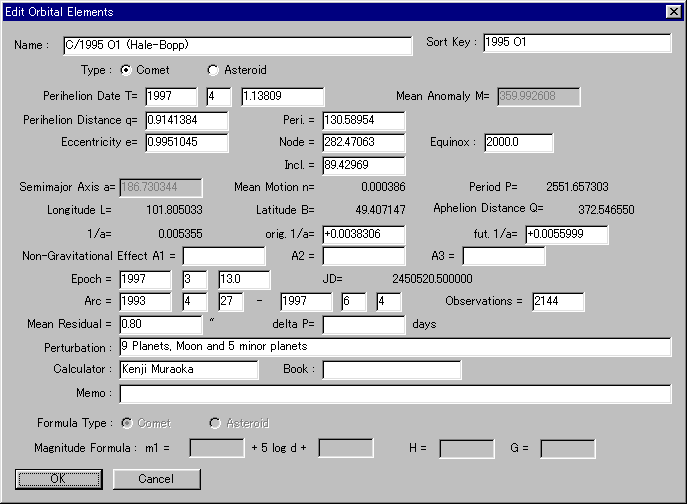
Here let's change the perihelion date as December 1, 1996.
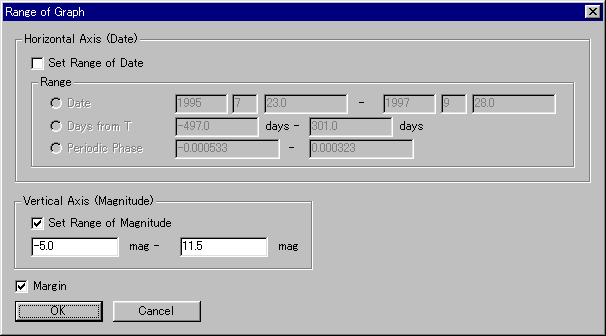
And please select "View" - "Range" menu, and set the range of magnitude as between 5.0 - 11.5 mag.
Then the light curve is changed as follows.
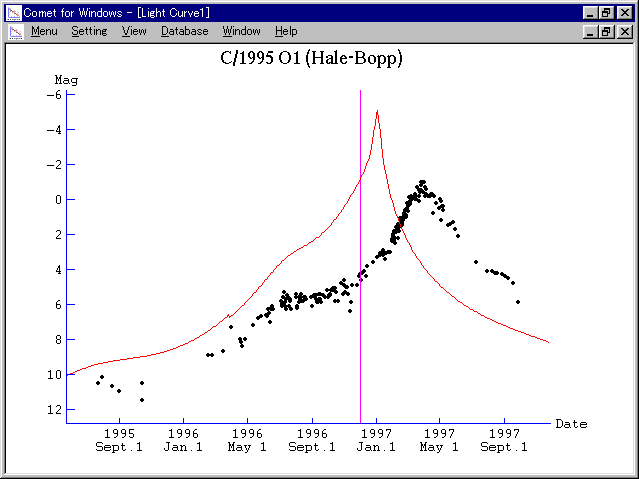
This graph shows that the comet will be extremely bright as -5 mag at best around 1997 January. Comet Hale-Bopp had a big potential.
Well, please restore the perihelion date before going to the next chapter.
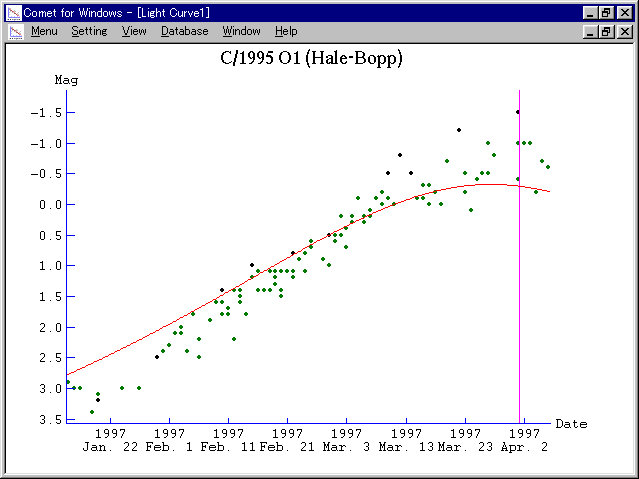
Because Comet Hale-Bopp was very bright, maybe you also observed it. So, let's add your own observations into the database.
For example, your observations were as follows.
| 1997 Jan. 20 | 3.2 mag |
| 30 | 2.5 mag |
| Feb. 10 | 1.4 mag |
| 15 | 1.0 mag |
| 22 | 0.8 mag |
| 28 | 0.5 mag |
| Mar. 10 | -0.5 mag |
| 12 | -0.8 mag |
| 14 | -0.5 mag |
| 22 | -1.2 mag |
| Apr. 1 | -1.5 mag |
Please select "Database" - "Magnitude" menu, and the list of magnitude data recorded in the database is displayed.

Here, please push "New" button and add your data one by one.
When you close "Database" dialog after adding all data, your magnitude data will be plotted on the graph.
Well, in order to concentrate on your observations, let's classify your observations into another group.
Please select "Database" - "Magnitude" menu and open "Database" dialog. Then push "Set" button, and "Set Group" dialog appears.
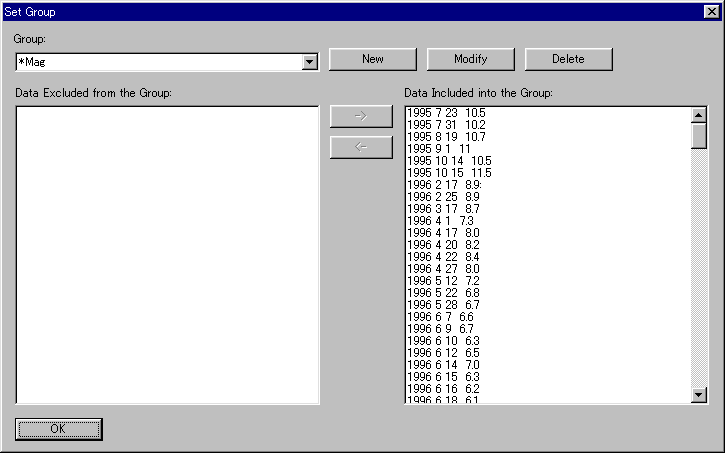
There is only one group "*Mag" at first.
Please push "New" button and add a new group. Let's set the name of the new group as "My Observations".
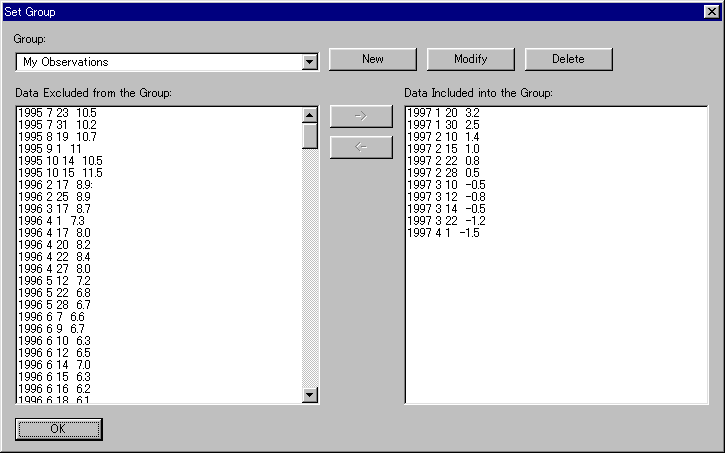
After creating a new group, back to "Set Group" dialog. If you select "My Observations" group, all data will be displayed in the "Data Excluded from the Group" list box at left side. So please select your observations data from the list, move to "Data Included into the Group" list box at right side, and push "OK" button.
Now that group setting is completed, let's draw a light curve with only your observations. Please select "View" - "Setting" menu and open "View Setting" dialog. Then check "Restrict Group" check box and select "My Observations" group. After pushing "OK" button, only your observations are plotted on the graph.
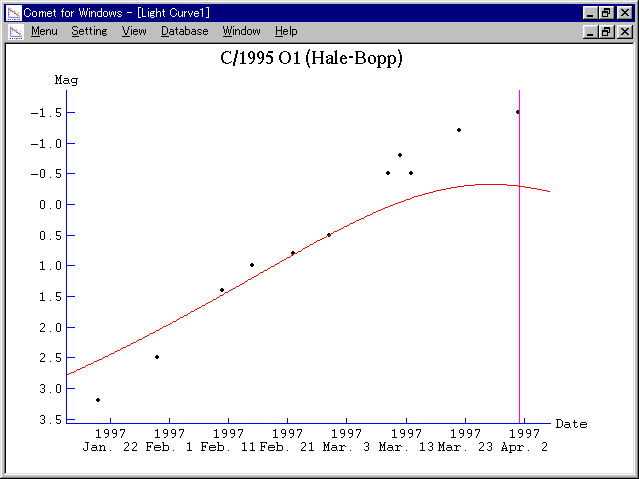
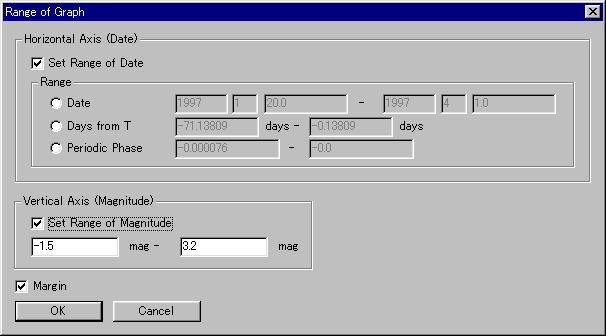
Here, please select "View" - "Range" menu, and check "Set Range of Date" and "Set Range of Magnitude" check boxed.
If you check "Plot Data Not in the Group" in "View Setting" dialog, all data are plotted in weak color, while only your observations are plotted in black.
Next, let's calculate a magnitude formula from your observations. Please select "Setting" - "Calculate" menu and open "Calculate Magnitude Formula" dialog. All observations data are selected at first, so please move all data to "Data Excluded for Calculation" list box at left side. Then select "My Observations" group and push "Select All Data in Group" button. Then only your observations data are displayed in "Data Included for Calculation" list box at right side, and a magnitude formula calculated only based on your observations is displayed at "Calculated Formula" part. In this case, the calculated magnitude formula is:
m1 = -1.23 + 5 log d + 15.03 log r
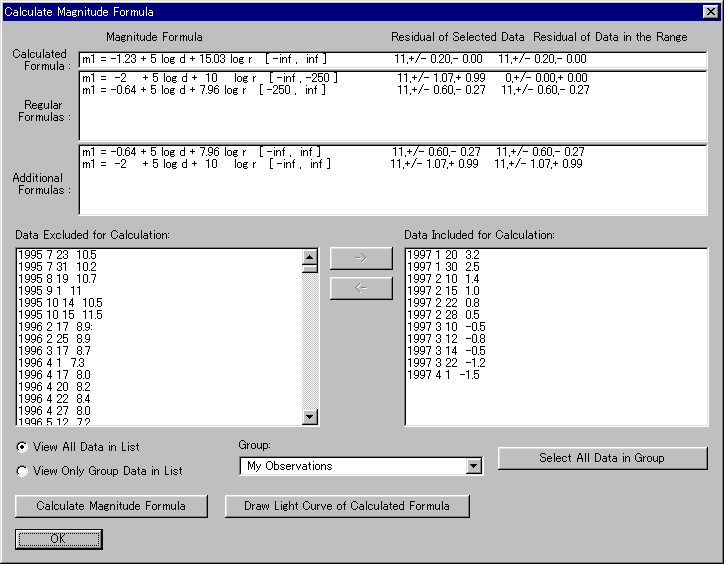
This result shows that your observation was fainter than others when the comet was faint, and brighter than others when the comet was bright.
![]()